
Quil offers an integration with Invenias. By connecting your account, you allow Quil to link meetings and have notes automatically pushed into your existing records. No more copy and paste.
Invenias Integration
Quil offers an integration with Invenias. By connecting your account, you allow Quil to link meetings and have notes automatically pushed into your existing records. No more copy and paste.
Not sure how to link records via Quil? Please read this article on how to manually link records
Where The Notes Go
When submitted, notes will appear in the “Activity” section on the Person record
Quil's Invenias integration allows linking records with People.
How to Setup
Quil Redirect
Quil's redirect is: https://salesq.app/oauth-callback
Create Invenias Credentials
This step can only be done by an Invenias account admin and only needs to be preformed one time. If your team has previously setup a Quil <> Invenias integration please refer back to your team admin for the generated Client ID and Client Secrets.
Login to Invenias and take note of your unique Invenias URL. 
Edit the URL and add “/api” to the end. Hit enter and you will be redirected to a Swagger API
portal. 
Allow the page to load. When ready, double click on the “api_key” field. You may see a window
popup briefly. When it closes you see a string of letters and numbers in the field. 
open more options. Click on “/api/v1/thirdpartyapplications” to open the request.
In the “request” text field paste in the following text.
{ "Expiration": "FiveYears", "Name": "Quil", "ReplyUrl": "https://salesq.app/oauth-callback", "FlowType": "Code" } 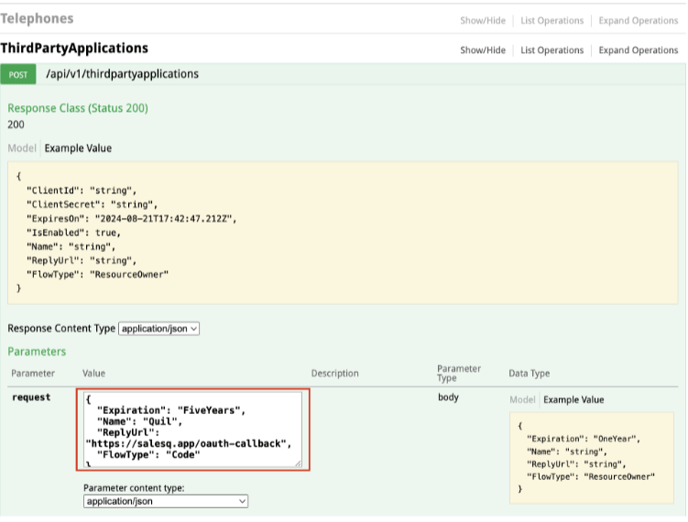
Scroll down a little and click the “Try it out!” button. Take note of the “Response body”. Copy the
ClientId and ClientSecret into a text file or somewhere safe. We will need it for the next step. 
Sign Into Quil
Authorize the Application
Navigate to your “Team Setting” and click select the integrations tab. 
Scroll down until you see Invenias and
click connect. 
A popup will appear.
Enter in your ClientId and ClientSecret from
the previous steps. 
Domain is the name of your Invenias
instance. For example if your Invenias URL
from step 1 is “https://quil.invenias.com”
your domain will be “quil”.
Once the details are entered. Press
“Connect”
Your page will refresh and redirect you back
to Quil.
After a successful connection, you will see a “Disconnect” button instead of the normal
“Connect”
For more details on where to setup your integration please this article on managing you integrations
Activity Types Supported
Invenias' "Note Action Types" are supported as activity types inside of Quil. For each meeting type you are able to specify the activity type you would like Quil to send your notes as.
When integrated with Invenias, you can select from a dropdown menu the activity type you wish to be applied to your database notes.

Database Fields
Quil does not support database fields for Invenias.
Database Documents
Quil's integration with Invenias currently does not support Database Document uploads
Supported Features
| Database Notes | ✅ |
| Activity Types | ✅ |